

Lampes en calebasse cultivées en terre
Eh bien, si nous en venons à notre sujet, nous parlerons de la fabrication d'une lampe à partir d'une calebasse, de sa durée de vie et de la méthode employée.
Nous proposons tout d'abord des calebasses soigneusement sélectionnées, aux dimensions les plus adaptées aux lampes que nous souhaitons fabriquer. Les dimensions moyennes les plus courantes sont de 20 x 30 cm. Les personnes qui transforment les calebasses en objets d'art préfèrent souvent les cultiver elles-mêmes.
Tout d'abord, on trempe la courge dans l'eau pour enlever la croûte, la rouille et les moisissures, ainsi que les premières impuretés. Ensuite, on la nettoie soigneusement en la frottant dans l'eau avec de la laine d'acier en aluminium. Certains utilisent du papier de verre, mais nous le déconseillons fortement, car ce n'est pas idéal pour les courges. Enfin, on laisse sécher la courge.
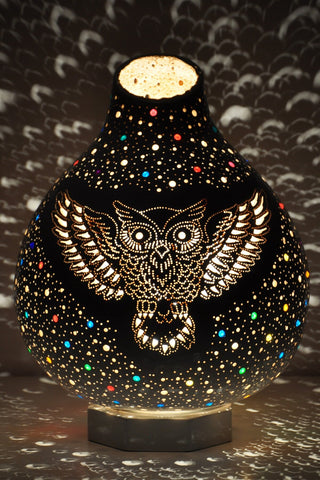
Des motifs et des dessins, adaptés à la forme de la citrouille séchée, sont dessinés sur celle-ci. Selon sa forme, sa taille et sa taille, il peut s'agir de tulipes, d'œillets, de motifs géométriques ou d'une peinture miniature.

Ensuite, percez de petits trous dans les motifs à l'aide d'une petite perceuse à pointe fine. L'utilisation d'une Dremel sera plus confortable car elle permet de réaliser facilement les motifs précis souhaités et offre une meilleure prise en main. Compte tenu de la finesse des motifs, il faudra peut-être percer en moyenne 1500 à 3000 trous dans une courge. L'une des étapes les plus agréables consiste à décorer les trous avec des perles. Vous pouvez utiliser des perles et des couleurs selon votre imagination. Placez les perles dans les trous, puis tapotez-les pour qu'elles s'y insèrent bien. Enfin, insérez une ampoule à l'intérieur de la courge. Appliquez une fine couche de vernis pour la finition. Si vous le souhaitez, vous pouvez également peindre le dessus de la courge avec une peinture à l'eau, puis appliquer une couche de vernis.